While logging is simple in concept, it gets rather complicated quickly within a Windows environment. Many will find that this is the key reason they find it so frustrating, however, learning the basics and sticking with it will be worth it as it will become a fundamental skill that you’ll leverage throughout your information security career.
Given my focus is on information security we’ll primarily focus on the windows security event logs as we go through this guide.
The Basics
The first thing to be aware of with windows logging is the format the logs get stored in. Unlike most logging formats you can’t just open windows logs in a text editor such as notepad, this is because they actually use a binary format. The formats evolved alongside the major generations of the Windows operating system.
| Windows Event Logs (.EVT) | Windows NT Windows XP Windows 2000 Windows 2003 | The first format to be used in the windows operating system. |
| Windows XML Event Log (.EVTX) | Windows Vista + | Provided the ability to have XML for custom log schemas, allowing custom properties & fields |
| Event Tracing for Windows (.ETW) | Windows 2000 | Provides highly efficient kernel-level tracing which is typically used for debugging & troubleshooting. |
With all three of these formats, you’ll notice how structured they are when compared to Linux or Unix style Syslog messages. This is the beauty of them, most of the built-in windows channels such as the Security log are extremely well documented and given their XML structure of them they can be easily parsed by third-party tools like SIEMs, more on this later.
If you ever find yourself looking to share a particular log file with someone else, you can always get the source location in explorer:
C:\Windows\System32\winevt\Logs
Next, you’ll need to be aware of windows event channels. These are used as sinks that collect events from a publisher and writes them to a file. There are two main groupings of channels, the Windows Logs group which is comprised of the 5 default installed as part of any operating system which is:
Windows Logs Group
- Application
- Security
- Setup
- System
- Forwarded Events
The other grouping is the Applications and Services logs which are created for each application or component. Generally, if you ever decide to create your own channel, you’ll do so by placing it in this group.
There is another division after this, there are two primary types of channels:
Serviced Channels: The more commonly used of the two, generally lower volume and most importantly can be forwarded to other systems and subscribed too easily.
Direct Channels: These are used for high-performance event collection and are disabled and not viewable by default. Most SIEM agents will have a harder time interpreting these types of logs when compared to serviced channel event logs.
Just to make it a little harder Microsoft gave you another sub-grouping of channel types.
| Icon | Channel Type | Channel Grouping | File Format |
 | Administrative Channels | Serviced Channel | .evtx |
 | Operational Channels | Serviced Channel | .evtx |
 | Analytic Channels | Direct Channel | .etl |
 | Debug | Direct Channel | .etl |
The last thing you’ll want to be across is the main 5 log types within window event logging. Some of these you’ll see more of than others depending on the log channel you are viewing, for example, you’ll mainly see the “Success Audit” & “Failure Audit” within the security channel.
| Icon | Event Type | Description | |||
 | Error | An event indicates a significant problem such as loss of data or functionality. For example, an Error event is logged if a service fails to load during startup. | |||
 | Warning | An event that is not necessarily significant may indicate a possible future problem. For example, a Warning event is logged when disk space is low. If an application can recover from an event without loss of functionality or data, it can generally classify the event as a Warning event. | |||
 | Information | An event that describes the successful operation of an application, driver, or service. For example, when a network driver loads successfully, it may be appropriate to log an Information event. Note that it is generally inappropriate for a desktop application to log an event each time it starts. | |||
 | Success Audit | An event that records an audited security access attempt that is successful. For example, a user’s successful attempt to log on to the system is logged as a Success Audit event. | |||
 | Failure Audit | An event that records an audited security access attempt that fails. For example, if a user tries to access a network drive and fails, the attempt is logged as a Failure Audit event. |
Windows Event Viewer
First of all, we’ll get started by opening the Windows Event Viewer either from a search or by opening up a Run window and typing in eventvwr

So from here, you’ll be presented with a screen that looks something like this. It’s broken down into 3 panels. Simply put the left panel will be used for navigating between different event channels. The middle panel will be used for viewing the logs, and the last on the right will be for running actions such as filtering.
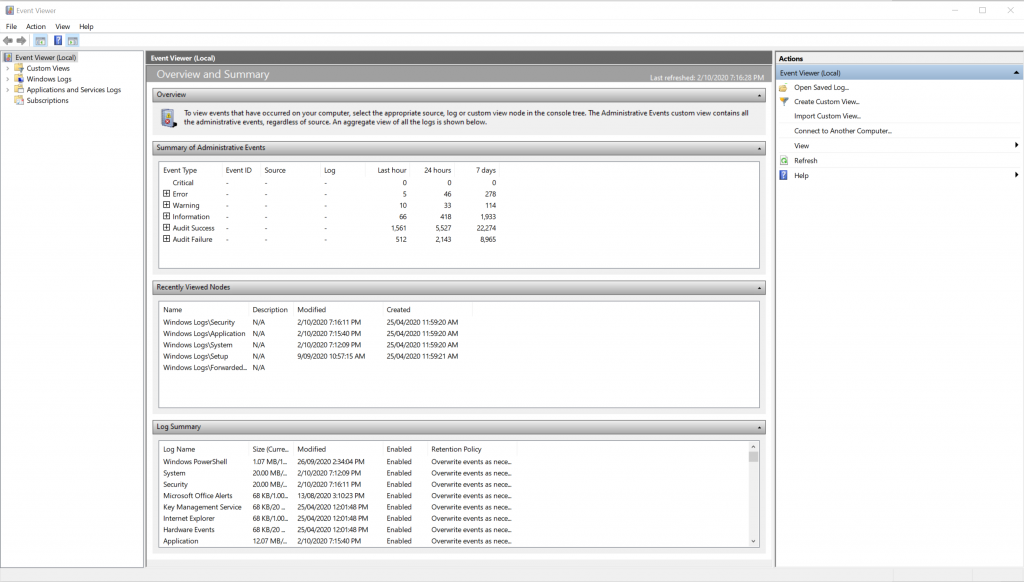
Starting with the navigation panel, you’ll see the windows log & the Application and Services log groups. Now you have most likely looked into the 5 basic windows logs but take a moment to have a look into the other grouping. You’ll be shocked at how many different log channels there are, there are some particularly interesting ones in the following folder structure:
Application and Services Logs\Microsoft\Windows\
We will jump into the real meat of it all: within the middle panel, where you’ll actually view events. In the top half, you can view all the different events listed, remember you’ll need to refresh for new events as it’s not a real-time panel. As the click on events, the lower panel will update to display the details of that particular event.
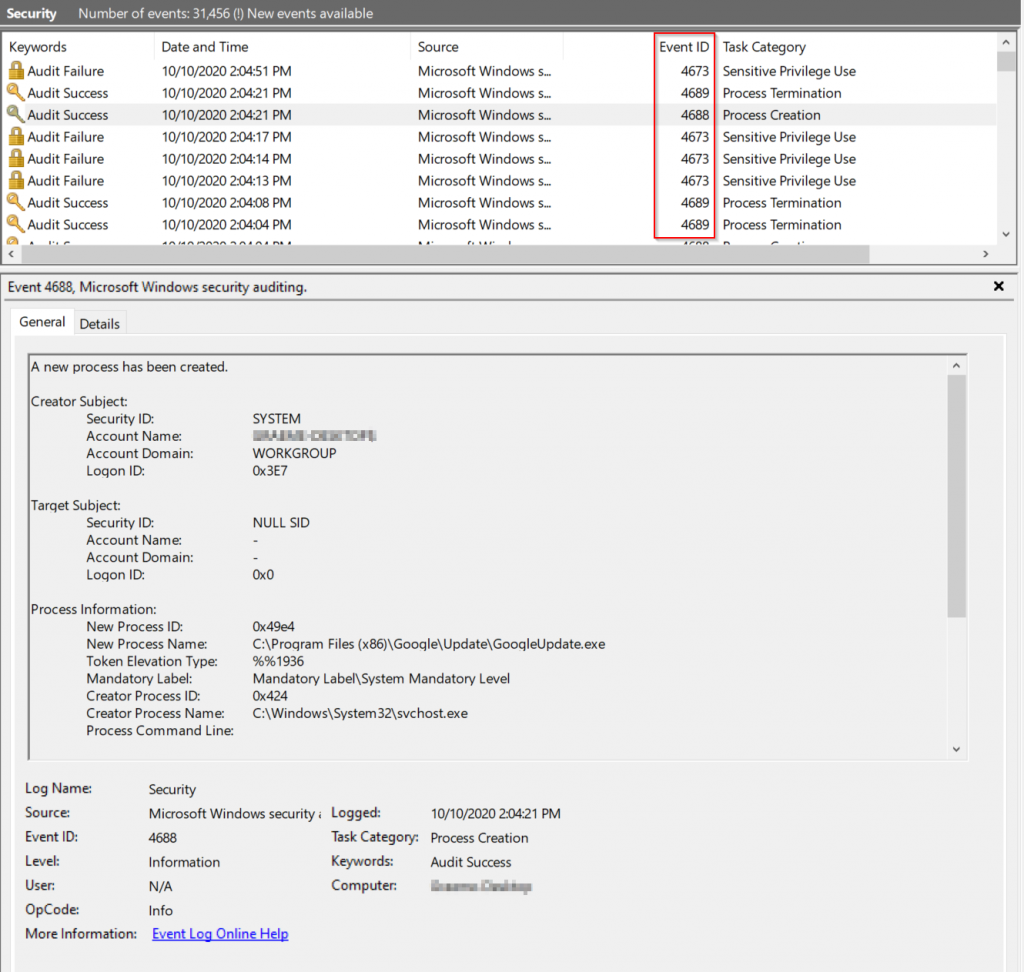
This particular event is a “Successful Process Creation” log from the Security channel. You can also see it has an event id of 4688. Every event in windows has an event ID and googling these will often give you an idea of what expected structure & fields that type of event will have. Ultimate Windows Security is an absolutely amazing resource for looking many of these up.
Lastly, you have the Actions panel, which is useful for interacting with log channels. I’ll just highlight a few features here, starting with the most useful one, “Filter Current Log”. Sifting through a huge log file and trying to manually find exactly what you are looking for can be annoying, using the filter speeds this process up. The options aren’t amazing here but even reducing logs by event ids & users helps.

Let’s say you regularly want to view both Process Creations & Terminations and don’t want to have to filter each time you open the event viewer. Well, this is where “Custom Views” comes in. It’s sort of like saved searches and looks fairly similar to the filter menu. It’s also interesting to note that you can set up filters across multiple event channels.

Once you click “OK” you’ll be able to save your channel with a name and description and even allow other users to view it with the little checkbox in the bottom right corner.

Once saved you can view it within the left navigation panel within the “Custom Views” folder for later use.
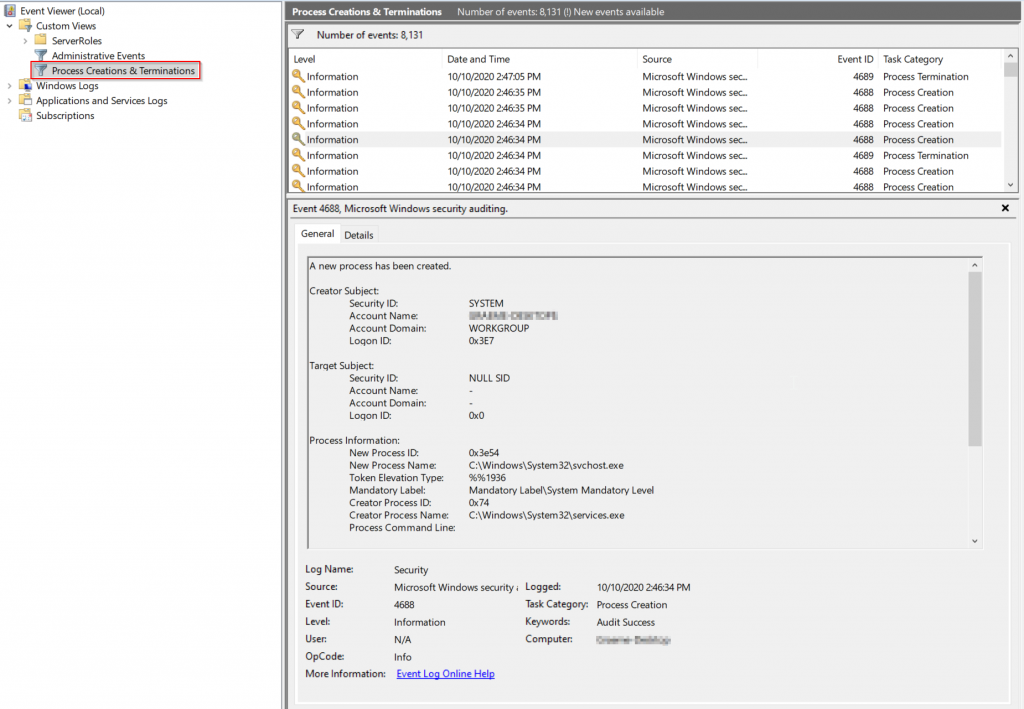
It’s important to understand that while the filtering capability may seem limited via the Event Viewer UI, under the hood, you can be very specific too through XPath queries. Also, there is no need to be an absolute wizard at it either, as the UI will convert our basic filters to XPath automatically and give you a basic structure to work with. Let’s view our saved filter.
Right-click the custom view and select “Filter Current Custom View”:

Our filter menu pops back up, and if you click “XML” at the top of the menu, you’ll be able to view our simple filter we have set up in XPath format.

Keep this in mind as we will use this feature later in the guide.
<QueryList>
 <Query Id="0" Path="Security">
   <Select Path="Security">*[System[(EventID=4688 or EventID=4689)]]</Select>
 </Query>
</QueryList>
An In-depth example – Process File Integrity Monitoring
Now that is all fairly basic, but I am not sure if you have noticed, those process logs contain some pretty interesting information in them from a security perspective however it would be great if we could get a hash of the process wouldn’t it? Well Event Viewer has one last trick up its sleeve, which could help us here. If you right-click an event it will bring up a context menu, and you can click “Attach Task to this Event”, this is going to take you through a wizard to set up a scheduled task that is triggered every time this event occurs.

Keep in mind you will only want to do this for very specific events that occur infrequently as it is not an overly efficient process. In this example, we will set up a scheduled task triggered by a specific program’s “Process Creation event 4688” which will then get the SHA256 hash of the process and export it to a file for further analysis.
Preparation
This quick guide does assume a few things. You’ll ideally already have Notepad++ installed (mainly because it’s just better than notepad), but if you don’t, you can always download and install it from this link. Obviously, you’re more than welcome to change the process name to any other process that you may want to perform file integrity monitoring on, but you’ll have to pay close attention to the guide to ensure all the references to Notepad++ are replaced.
I’ve written a basic PowerShell script (excuse my basic scripting ability) that will simply take a process path, hash it, and export it to a CSV file.
param($NewProcessName,$Timestamp,$Computer)

$export = New-Object -TypeName psobject

$Sha256 = Get-FileHash $NewProcessName
$export | Add-Member -MemberType NoteProperty -Name ProcessExecTimestamp -Value $Timestamp
$export | Add-Member -MemberType NoteProperty -Name ComputerName -Value $Computer
$export | Add-Member -MemberType NoteProperty -Name Hash -Value $Sha256.Hash
$export | Add-Member -MemberType NoteProperty -Name HashAlgorithm -Value $Sha256.Algorithm
$export | Add-Member -MemberType NoteProperty -Name Path -Value $Sha256.Path

if(Test-Path FileMonitoring.csv) {
    $export | Export-Csv -Path FileMonitoring.csv -NoTypeInformation -Append
} else {
    $export | Export-Csv -Path FileMonitoring.csv -NoTypeInformation
}
You’ll need to save it to:
C:\
Exercise
While we can continue to create the scheduled task via Event Viewer, in this instance we are going to switch to Task Scheduler as it will allow us to be more specific in our event-triggered task.
Open a command prompt and type “taskschd” to open Task Scheduler.

Once it’s open, go to “Task Scheduler Library” and then “Event Viewer Tasks”. We have chosen the “New Task” option because it will allow us to be more granular as to what will trigger our scheduled task.

Next, give your task a name, I’ve decided to call mine “Event-Triggered-FIM-Notepad”.

Next, we’ll move on to establishing a trigger.

We’ll then set the trigger to start “On an Event” and change the settings to Custom. Basic will only allow the trigger to be started by just a single Event ID. We are going to configure our task to execute only when a specific process is launched.
Lastly, hit “New Event Filter”.

Switch to the XML path to allow us to filter using an XPath query, select “Edit query manually” & and click “Yes” at the prompt that appears.

Remember we saved a query earlier in the article? We’ll use that as a base and modify it to suit our needs. Adding a filter to look specifically when Notepad++ is launched.
<QueryList>
 <Query Id="0" Path="Security">
   <Select Path="Security">*[System[(EventID=4688)]] and *[EventData[Data[@Name='NewProcessName']='C:\Program Files\Notepad++\notepad++.exe']]</Select>
 </Query>
</QueryList>
Click OK, and again to exit the “Edit Trigger” panel and OK again to get out of the properties of your scheduled task window.
Lastly switch to “Actions”, this is where we’ll tell our task what we actually want to do when our conditions are met.

We will select “Start a program” as our action and update the “Program/Script” field with the following:
Powershell.exe
For “Add arguments” we are going to need to do two things here, firstly specify the location of the script we are going to call with PowerShell, we have called ours “ProcessHash.ps1” and placed it within the root of C:\. We will need to add the argument from the event that we will need to pass to the script to calculate the hash. Going back to an example event, we know we want to pass the “New Process Name” field to the script, so that will also be added in this section.
In our example, the full line of the “Add arguments” section looks like(You’ll notice that we placed the $(NewProcessName) within single quotes, this was to ensure the full path of the executable was passed and not shortened by spaces within it):
C:\ProcessHash.ps1 -NewProcessName '$(NewProcessName)'

Lastly set the “Start in” section as the following and press next.
C:\
The final result should look something like this.

We now need to tell the task to actually export the values from the event to be passed to our script. To do this, we’ll need to export the XML of the scheduled task by right-clicking the task and selecting “Export…” Save this to your desktop or somewhere handy.

Now right-click your saved file and edit the XML with a text editor such as Notepad++. Your file should look something like this.
<?xml version="1.0" encoding="UTF-16"?>
<Task version="1.2" xmlns="http://schemas.microsoft.com/windows/2004/02/mit/task">
<RegistrationInfo>
<Date>2022-09-24T17:32:54.3141585</Date>
<Author>DESKTOP-16BR1NS\bingh</Author>
<URI>\Event Viewer Tasks\Event-Triggered-FIM-Notepad</URI>
</RegistrationInfo>
<Triggers>
<EventTrigger>
<Enabled>true</Enabled>
<Subscription><QueryList><Query Id="0" Path="Security"><Select Path="Security">*[System[(EventID=4688)]] and *[EventData[Data[@Name='NewProcessName']='C:\Program Files\Notepad++\notepad++.exe']]</Select></Query></QueryList></Subscription>
</EventTrigger>
</Triggers>
<Principals>
<Principal id="Author">
<UserId>S-1-5-21-3368705641-623784599-2872220672-1001</UserId>
<LogonType>InteractiveToken</LogonType>
<RunLevel>LeastPrivilege</RunLevel>
</Principal>
</Principals>
<Settings>
<MultipleInstancesPolicy>IgnoreNew</MultipleInstancesPolicy>
<DisallowStartIfOnBatteries>true</DisallowStartIfOnBatteries>
<StopIfGoingOnBatteries>true</StopIfGoingOnBatteries>
<AllowHardTerminate>true</AllowHardTerminate>
<StartWhenAvailable>false</StartWhenAvailable>
<RunOnlyIfNetworkAvailable>false</RunOnlyIfNetworkAvailable>
<IdleSettings>
<StopOnIdleEnd>true</StopOnIdleEnd>
<RestartOnIdle>false</RestartOnIdle>
</IdleSettings>
<AllowStartOnDemand>true</AllowStartOnDemand>
<Enabled>true</Enabled>
<Hidden>false</Hidden>
<RunOnlyIfIdle>false</RunOnlyIfIdle>
<WakeToRun>false</WakeToRun>
<ExecutionTimeLimit>PT72H</ExecutionTimeLimit>
<Priority>7</Priority>
</Settings>
<Actions Context="Author">
<Exec>
<Command>Powershell.exe</Command>
<Arguments>C:\ProcessHash.ps1 -NewProcessName '$(NewProcessName)'</Arguments>
<WorkingDirectory>C:\</WorkingDirectory>
</Exec>
</Actions>
</Task>Within the <EventTrigger>(lines 9 – 13) section we are going to add another grouping of tags called <ValueQueries> which can be treated as a way of telling the scheduled task which event parameters you’d like to export from the event triggered. This node will look something like this:
<Triggers>
<EventTrigger>
<Enabled>true</Enabled>
<Subscription><QueryList><Query Id="0" Path="Security"><Select Path="Security">*[System[(EventID=4688)]] and *[EventData[Data[@Name='NewProcessName']='C:\Program Files\Notepad++\notepad++.exe']]</Select></Query></QueryList></Subscription>
<ValueQueries>
<Value name="NewProcessName">Event/EventData/Data[@Name='NewProcessName']</Value>
<Value name="TimeCreated">Event/System/TimeCreated/@SystemTime</Value>
<Value name="ComputerName">Event/System/Computer</Value>
</ValueQueries>
</EventTrigger>
</Triggers>I have added three values (lines 6 – 8) from different areas of the event to illustrate how to extract them. It is quite handy to use event viewer to look at the structure of your event in XML view to assist in extracting values.
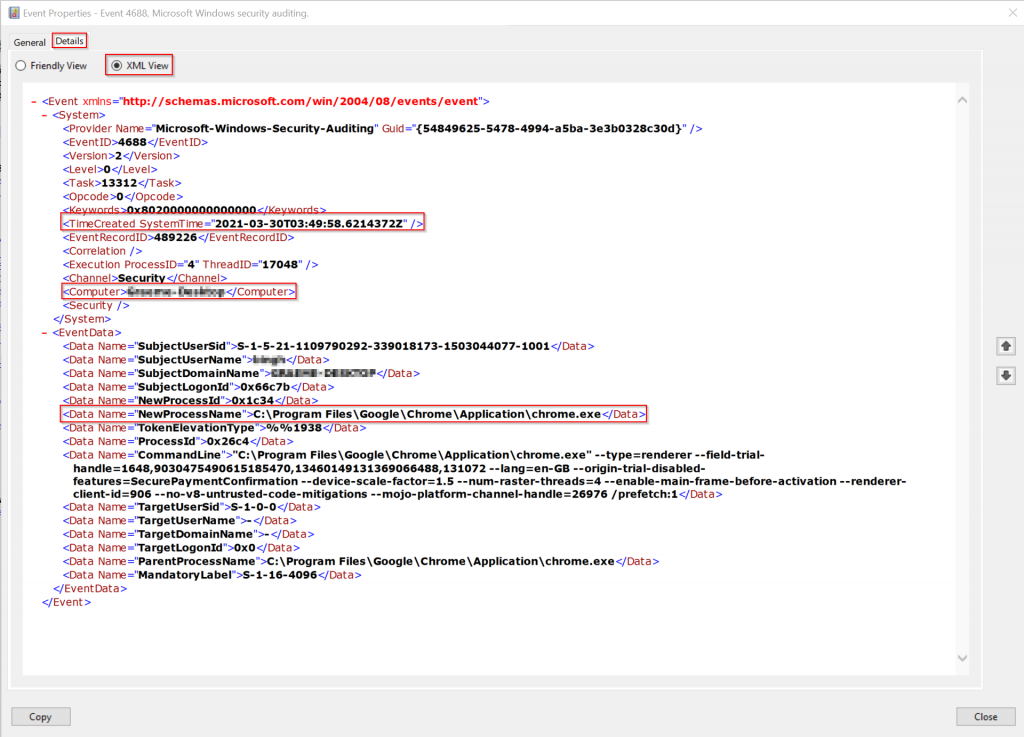
The last piece in the puzzle is to add them to the arguments component on line 43 of our Event-Triggered-FIM-Notepad.xml file to include the following:
<Arguments>C:\ProcessHash.ps1 -NewProcessName '$(NewProcessName)' '$(TimeCreated)' '$(ComputerName)'</Arguments>
Next, delete our original scheduled task and let’s re-import it with our modifications.
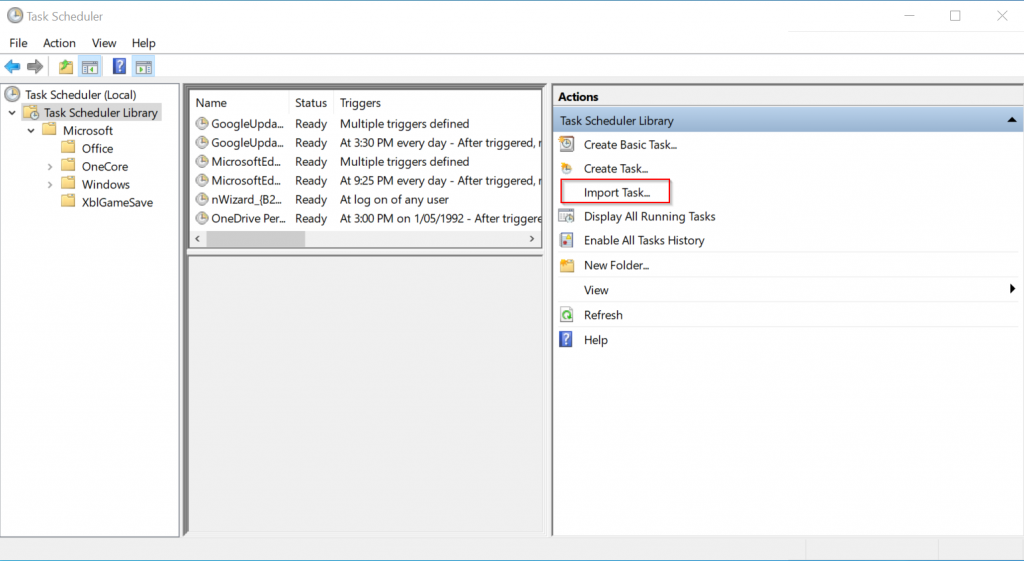
As our script is located within C:\ a directory that requires administrative privileges we’ll also need to check “Run with highest privileges”.

Now, all we need to do is open a Notepad++ process, and our schedules task should kick into action and run our PowerShell script. Open Run, type “notepad++” and press OK.

Let’s open file explorer and see if our CSV file was created. As you can see our file was created and if you open it up, you’ll see the process execution time, computer name, Hash, Hash Algorithm and process path.
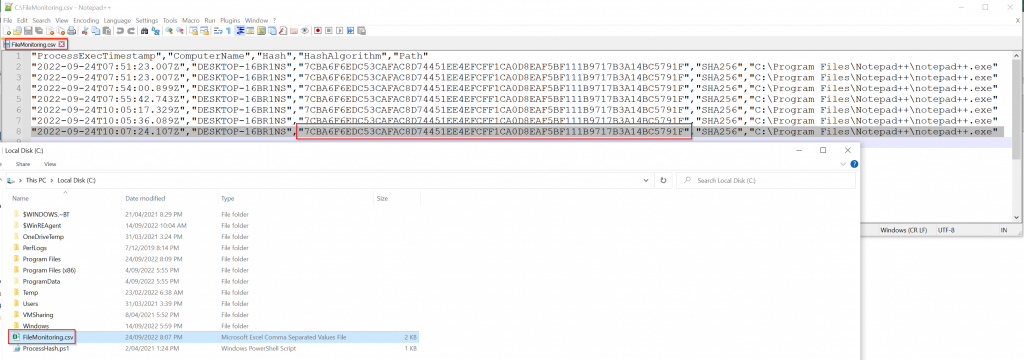
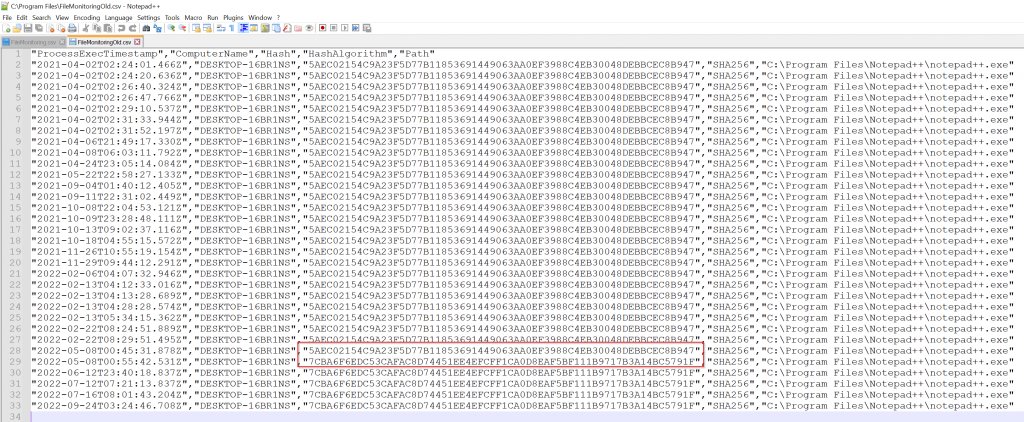
In the example below, you’ll notice that the hashes have changed due to an update of Notepad++. You could use this exact technique to monitor any process!
Conclusion
So hopefully you were able to follow along and discover just how powerful windows events paired with scheduled tasks can be. While the technique we used does not scale particularly well, there are better solutions such as Sysmon that will do a much better job of process monitoring it does illustrate a couple of concepts.
- Basics about Windows Event Logs
- Navigating Windows Event Viewer
- XPath Queries to filter Windows Channels
- Scheduled tasks triggered by windows events
